
The Designer Mystery 2023 project finishing kit involves a lot of flying geese. Big ones, 3 1/2 x 6 1/2". I like to use the method of making four at a time, making them a bit oversized and then trimming them down.
One thing that has been throwing folks for a loop is that we need to turn 17 of our big flying geese units into double flying geese. Have you ever made these? It was pretty easy and I'm about to show you how I did mine. If you are at all confused, hopefully, the visual will help.
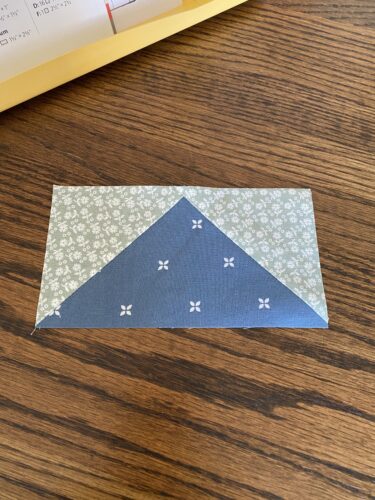
Start with one of your trimmed flying geese. Mine is 3 1/2 x 6 1/2. What you need now are two 3 1/2" squares of the lighter "sky" fabric.
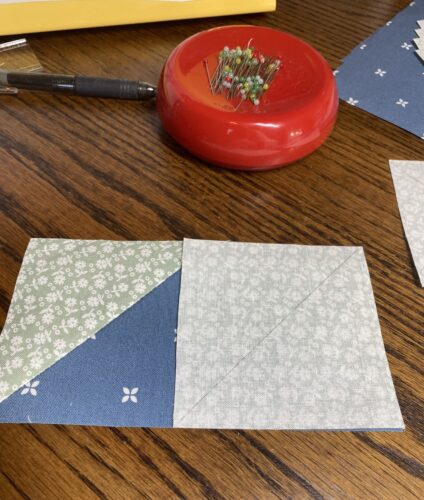
Draw a diagonal line on it and place it as I have shown. Stitch on the line, flip the corner over and trim.

Do you see where we are going with this? My unit is flipped upside down, but you see I have slapped on the second square, drawn a line and am about to stitch on it.
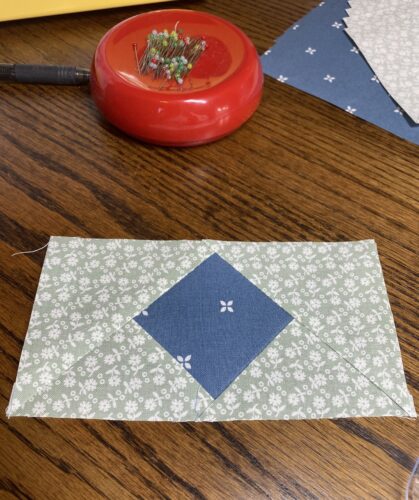
And there you have it, a double flying geese unit. All we did was add two more corner squares.
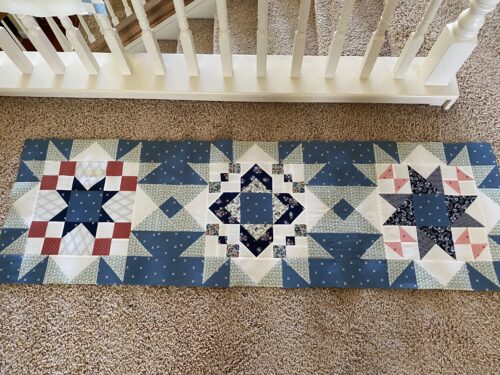
Here is my first row all completed! You can see how the complicated finishing procedure really sets off the blocks. I am so glad I decided to attach the block surrounds as I go, rather than leave it all until the blocks are made. That chore could well cause me to procrastinate for who knows how long!

8 Responses
I had never heard of the double ones! Very pretty all together 😻
This is going to be a beautiful quilt! And nor have I heard of the double flying geese. I can’t sew the regular ones straight, let alone the double ones! Today I am choosing a new quilt to get started on. So use up really old fabric or choose new, fresh fabric?? Have a great day of sewing, Nicole!
I also had never heard of double flying geese! They are very pretty. Thank you for sharing.
These are beautiful blocks in beautiful colors Nicole. I biggied the three blocks together and they are gorgeous. Take good care of your magnet pin holder. I had to replace one of mine. Not only was it more expensive, it was cheap and lightweight, the pins don’t lay north and south in the center, they lay around the edge and stick out from the magnet. My originals had a huge magnet in the center and I suppose that was expensive so the newer version probably has a smaller, cheaper magnet and the results were my well-trained hands that could reach pins blindfolded now had a new pattern that caused a number of “sticks.” Ouch. Luckily I still have two of the magnet pin holders and I’m making do.
People on Facebook were having a tough time with that block. The problem, in my opinion, was the showed the directions with the initial flying geese vertically not horizontally. I did the same demo on a comment in the Mystery Quilt group. It’s a lovely block!
And, if you ever questioned whether to continue your blog…the answer is keep ’em coming because your demos & tips are so valuable to your appreciative readers! Many of us had never heard of a double flying geese block, let alone have tried one! Thank you for another great tutorial!
The setting for this quilt is fantastic, really inspired. I wonder if they sell the pattern for it or the directions or something.
There were a ton of these double flying geese in The Ribbon Runs Through It BOM last year, except the second round of squares was in a different color. Lynn from Sewn Wild Oaks said the first round was the wings and the second round was the sky. Beautiful blocks! Your designer Mystery Quilt looks fabulous– I guess the setting kit was worth the money— by the time I added up quilt, setting, and backing kit I felt kind of priced out! Next year is supposed to be something “different”– can’t wait to see what it is.