
I can't claim to be an expert on machine binding, but I have done a few lately with good results. A number of you have asked for a tutorial, so here you go. As I said, this is just the way I've been doing it, and it's working great for me.
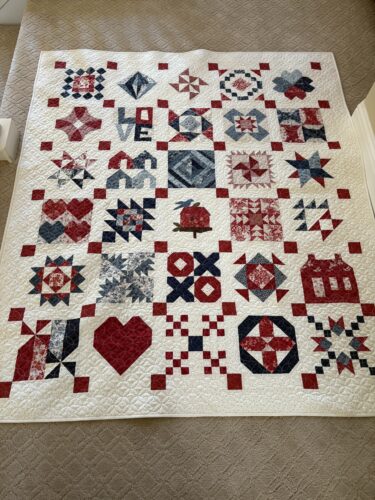
The very first thing to pay attention to is trimming up the edges of your quilt. You want it trimmed straight and very evenly. No extra batting or fabric sticking out. My photo above shows just how I like the quilt to be prepared. Next, make your binding, any way you like to do it. I cut my binding a narrow 2 1/4", which makes catching the underside of the binding somewhat challenging by machine. With lots of pressing and pinning, you can do it.
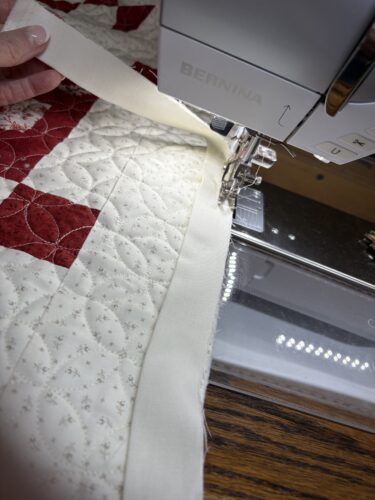
Attach your binding to the quilt.

Pressing is super important with my method. Press the binding AWAY from the seam you just sewed using a hot steam iron. As you see, I am pressing the top side of the biding outward. Press it really well, using lots of steam.
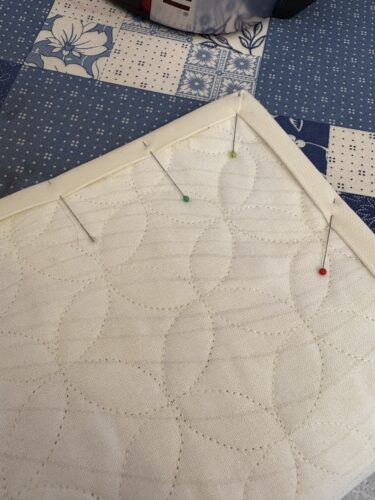
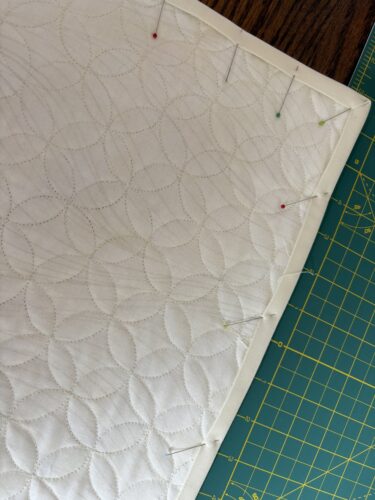
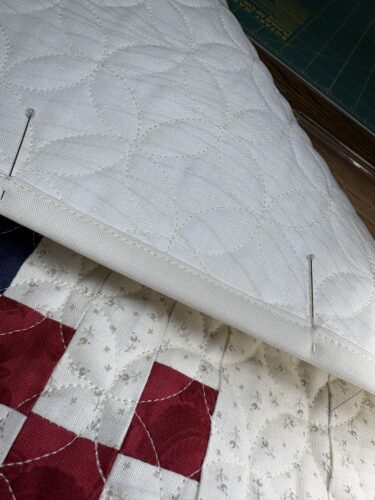
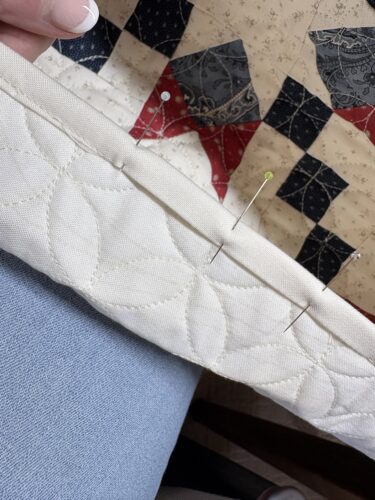
Flip the quilt over. Now press the binding over to the backside. Press it well, use lots of steam and place pins as shown as you go around the circumference of the quilt. You want to fold the binding over evenly and to be sure you cover the seam where you attached the binding to the quilt. It will feel tight. You are going to be stitching in the ditch on that seam on the topside of the quilt and you want to be sure to catch the underside of the binding. Notice the placement of the pins. I don't use a ton of them, and I just catch a bit of fabric and have the sharp tip aimed outward, but not over the edge of the binding.
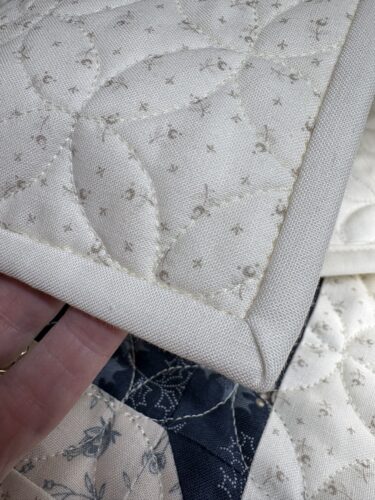
Here is another picture of my prepared quilt, ready to stitch.
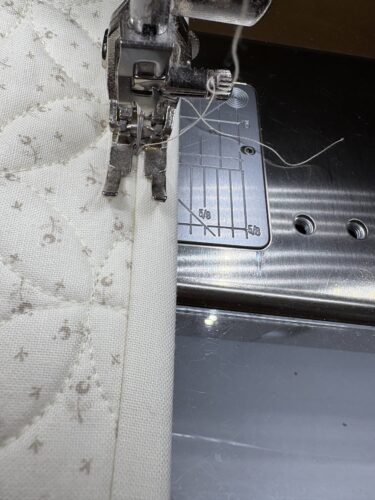
Flip the quilt over again to sew on the topside of the quilt. You will be stitching in the ditch where you attached the binding on the top side of the quilt. You will sew very slowly. As a matter of fact, if you can, adjust your machine speed so you cannot go fast at all. You want to be slow as a turtle and keep that needle in the ditch.

My Bernina has a speed regulator that I can use to slow down the sewing speed. No matter how hard I press down on the foot pedal, my machine will sew at a snail's pace. This is what you want to achieve: going slowly for accuracy in your precise stitching in the ditch.
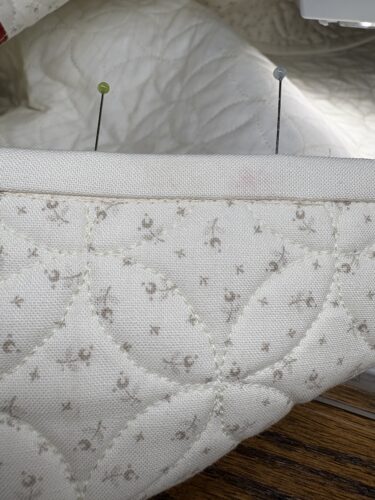
As you carefully and slowly stitch along the length of your binding, occasionally turn back the quilt to take a peek at what you have finished to see how it's going on the underside. I am pretty happy with what I see here. All the edges are caught up and the stitching looks even. I typically pull out the few pins I can see that I have already sewn over.
Once you have stitched in the ditch all around the whole quilt, carefully inspect both si
des to see how it looks. I am super happy with my stitching here. It barely shows on the top and the corners look great. Now, turn it over and check the back side to make sure all the binding has been caught by your stitching. There often is a spot or two that didn't get sewn.
Oops, what did I tell you? Darn, I was being so careful. Don't worry this is an easy fix. You might be surprised at how I do it. I sew it from the underside, not in the ditch again on top. I pin carefully, and sew just on the very edge of the binding that didn't get caught on the first pass.

Here I am, making my repair on the underside of the binding. I am just barely catching the edge of the binding all along that section that didn't get sewn. So, how will it look on the top?
This is what my fix looks like on the top side, and I'm not mad about it. Typically, any unsewn area won't be very long, so these "fixes" will be barely noticeable on the top side.
I hope some of this information may have been helpful to you if this is something you have been wanting to try. I have decided I much prefer it to hand binding, and think it looks fine. There are loads of ways to do this process. Some people use glue or fusible tape to hold their binding down, but this method is the way I have come to do it. That is my machine binding journey!


16 Responses
I have five charity quilts to use for practice.
I am cutting the binding at 2.5” to give myself a little ease.
I am going to have my daughter hand sew the corners for these first ones.
I ordered “Warm Company Lite Steam-A-Seam 2 Double Stick Fusible Web Tape -1/4″ X 40 Yards” from Amazon to try.
I have small clips to try in addition to my long pins.
I use 100% cotton batting, so I will definitely try ironing.
Thanks for this post, it has given me confidence to try.
Thanks! Great tutorial. This looks doable and thank you for showing where it didn’t work and how you fixed it. I have some kids’ quilts to donate and they want the binding sewn on by machine. I had tried the glue method and made a mess, so I will try this method. Thanks again.
I do my bindings similarly, like you say, lots of different variations. One thing I have been doing differently lately is using different feet. I use Bernina #8D to apply the binding, and #10D to stitch in the ditch. The 8D foot is for heavy/thick fabrics, so I find it handles the bulk better, it’s a narrow foot, the edge will give a generous 1/4″. The 10D has a flange and it is easy to run it in the ditch with the needle moved to the right a few clicks.
Thanks so much for the in-depth tutorial on machine binding. Your quilt looks great! I am actually one of those weirdos who likes to hand bind my quilts, but there are occasions (such as baby quilts and such) where machine binding is required. Your directions are very clear and easy to understand.
I remember a post quite a while ago when you used a fabric glue. Do you still use that before sewing the binding down?
Thanks, Nicole. I really should give this a try on a smaller quilt. Have a great weekend!
This is exactly what I do except I pin the binding parallel, inserting the pin in the seam. I also slow my machine speed way down so I can easily remove the pins as I approach them. I’ve made the repairs where I missed catching the binding from the back. Going to try it from the front. Seems like it would be easier than ripping out. Thanks so much for sharing!
Thanks for your clear instructions and photos of this process. It’s going to be helpful as I plan to machine bind the quilt I’m currently working. I don’t know why a new technique can be so intimidating until you try it. Thanks again for the inspiration!
Your instructions are clear & the photos are easy to follow. I appreciate your attention to detail for those of us who haven’t attempted machine binding…yet. Thanks for the extra effort!
Thanks Nicole. I will try this on my next quilt. Great instructions and photos make it easy to follow.
Great tutorial!
I usually hand sew the corners before doing the rest by machine.
Hugs!
thank you! this was really helpful. a few weeks ago you told me to press my binding b4 sewing it down. I did and I loved how much easier it was to hand bind after it had been pressed.
I know it was a lot of work to do this post so thank you for giving up your time. have a great weekend and stay cool as much as you can.
Thank you so much for explaining your machine binding method. I really don’t like to bind so I’m going to have to try this, but I think it will have to be on a small project to start with.
Excellent tutorial! Thank you for sharing your tips and experiences. I’m going to try this on a small project, we’ll see how it goes! Your binding and quilt is perfect.
Great job Nicole on both the tutorial and your quilt which is lovely! I am going to attempt this method this week!
Thanks for your efforts!
My library had two books by Dorothy Whipple on audio format – Someone at a Distance and They Were Sisters. I checked out both, Libby.
If you like that era, have you read the classic – “Mildred Pierce” a 1941 novel by James M. Cain?