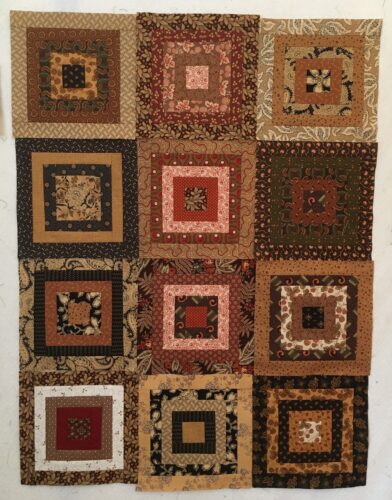
These Courthouse Steps blocks are so addicting, I am not sure I can stop! I have made a dozen and could happily keep going indefinitely. I have been raiding my stash of browns, blacks, rusts, golds and now some greens. Some of these fabrics have made appearances in other favorite quilts I have made, and I am enjoying handling them again and remembering past projects. And also wishing I had purchased more yardage of some of them! This project is perfect for someone like me, whose greatest joy is putting fabrics together!
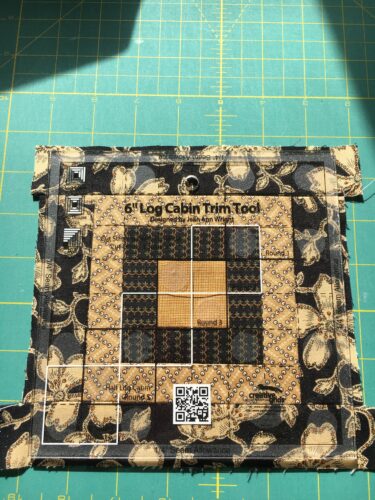
I have decided upon a process for making the blocks that is giving me good results. You can absolutely make these Courthouse Steps blocks with any ruler, but I decided to use the six inch Log Cabin Trim Tool by Creative Grids. Here's why: It has amazingly clear markings, both in white and in black, and all sorts of lines to help you line up your block to trim perfectly accurately. Only one problem: the block only has three rounds around the center square and I want four.
So here is what I am doing. I am cutting my center square 2 inches square, and my strips are 1 1/2 inches. You do not have to precut the strips into various lengths (a major pain), you just trim up after each round. When I get to that missing fourth round, I sew the strips just as I have with the other rounds, and then trim to a perfect 8 inch square with my Creative Grids 8 1/2 inch ruler.
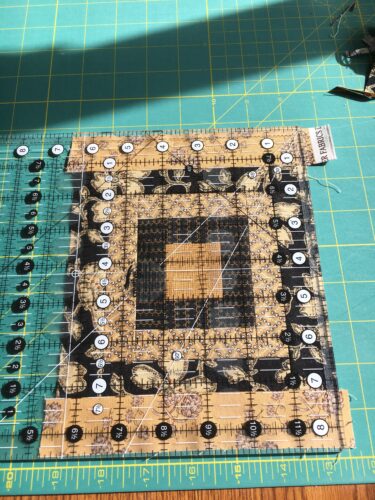
After sewing the first two strips of the last round, I use the ruler to even things up a bit so the sides are straight. Sew the last two strips on.
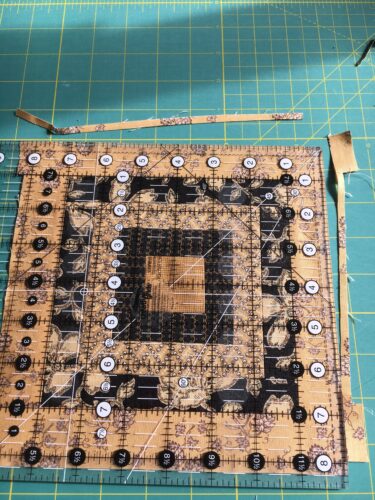
Use the 8 1/2 inch ruler to trim the top and right hand sides of the block. Flip the block and trim the other two sides.
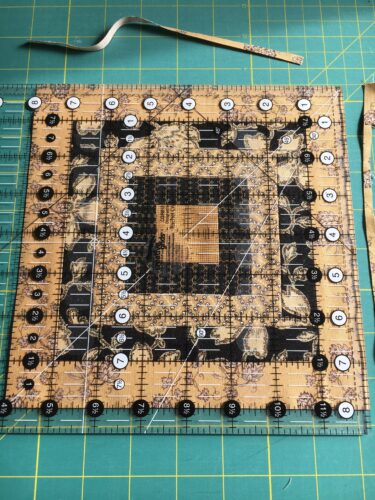
And you have a perfect 8 inch unfinished block (7 1/2") finished. I have my five fabrics and the narrow strips I wanted. Those 1 1/2" strips I was sewing on each got trimmed down so they are 3/4" finished.
Now, there is an 8 inch Creative Grids Log Cabin Trim ruler, which I have used previously in other projects, but you only get the three rounds of fabrics and the strips are wider, resulting in a "clunkier" look to me. I wanted to show off more fabrics and use thinner strips. Using the combination of the 6 inch Log Cabin Trim ruler plus my 8 1/2 inch regular ruler is giving me exactly the results I wanted.


12 Responses
Now that 8.5″ ruler is one I do need. I have nothing that size.
Am gald you’re enjoying this process so much!
Hugs!
I too enjoy log cabin style projects. The process is so satisfying . Yours are rich in color and will make a fabulous finish.
The blocks are looking great and don’t you just love it when things line up so nicely. Thanks for showing your process, I learned a few tricks from you.
I LOVE this quilt. Thanks for sharing your process. Hugs
Your blocks are beautiful! And I’ve learned a thing or two from you about making perfect Log Cabin blocks.
Your colors are gorgeous! I made one block using your method for a ‘mini quilt’ in a project our fiber arts group is doing. Worked like a charm! Thanks for the tips!
Your blocks look so beautiful together!
somebody drank the kool-aid….i’m trying so hard not to jump in on any the fun sew-alongs on IG. I have UFOs from last year i need to finish. ;p
If that ruler eliminates the step having to pre cut the length of each strips for a log cabin block, I’m in! It’s fun to see part of your collection of fabrics in these blocks
Hyperventilating here!!!! Love ….LOVE your colors! This is great Nicole!
Great technique! It’s got to be super-accurate and your blocks look wonderful.
Clever girl! Love how you figured out how to get the look you wanted and it’s fabulous 😉