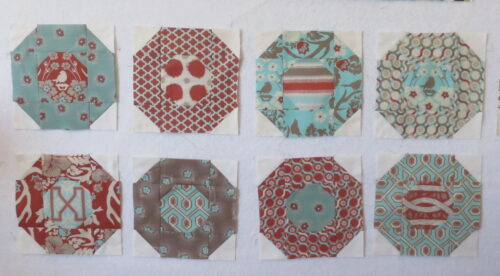
Several people asked me about the pattern for the plate blocks. I had started this project quite a few years ago, using an old Gai Perry book, "Quilted Gems".

That is where the idea came from anyway. I did not at all use the method Gai did in her book. She used an octagon template for the center of each plate block, and pieced triangles for the half square triangle units and the plate center corner squares. Oh dear. Those methods seem so out of date don't they? The book was published in 2003 by C&T Publishing, and is no longer in print, although you can get used versions for next to nothing on Amazon.com. The book is full of wonderful ideas for projects, and is worth having, even if you change up the construction methods as I did.
Here is what I did to make the 11" plate blocks:

Cut out one 5 1/2" center square in a contrasting fabric for the plate center.
Cut out four 3 x 5 1/2" rectangles, two 3 7/8" squares and four 2 1/8" squares from the fabric you want the outside of the plate to be.
Cut out two 3 7/8" squares of background.

Draw diagonal stitching lines on the four 2 1/8" squares and position them on the 5 1/2" square for stitching. Stitch on the drawn line. Draw diagonal lines on the background square and position it right sides together on the print fabric for the half square triangle units. Stitch one quarter inch from the drawn line on both sides.
After stitching, trim the triangles from the 5 1/2" block corners and flip open and press. Cut the 3 7/8" squares apart on the drawn line. Open and press to the darker fabric.

Your half square triangle units are oversized. Trim them down to 3".

Lay the nine pieces out as shown and sew together.

And there is your finished plate block!
I will probably stop with eight blocks and make a table runner. The blocks will have a cream colored lattice to separate the "plates" and show them off a bit better. The book shows a version done in various blue and white "chintz" style prints. Those plates look like a set of Blue Willow tea set dishes!

11 Responses
Looks pretty easy … amazing how much techniques change in 10 years. 😉
They look like spring bird nests to me– very nice for an April table 🙂
Thanks for the stellar tutorial about your method for making this plate block and the cutting measurements! It is amazing how block construction methods have changed in 10 years.
I have had the “Quilted Gems” book for a decade or more with bookmarks at pg. 22, pg. 80, and pg. 108 for someday. It seems those “somedays” haven’t arrived yet.
Hugs!
Very pretty plate blocks, and with your tutorial, very easy to make.
What a fun and easy quilt to make Thanks for the tutorial
Great tutorial! Especially for those of us who are ‘visual learners!’ I swear by your zipper tutorial & have shared it with other quilters a lot!!! Your pretty blocks will make a wonderful Spring or Summer table runner!
It’s rare when I don’t change up methods from a pattern. I go to my tried and true methods most of he time but will always try something new. You never know when that pearl of a technique will be added to your bag of quilting tricks. Love your kaleidoscope quilt. It turned out fabulous.
They are beautiful! perfect for a table runner. ;p
Well done tutorial! I especially liked the measurements and then the pictures that flow with the process. cute fabrics, too!
Thank you for this! I love that pattern and bought the book used just for it. This looks much easier! Thank you Nicole!
Love the tutorial! I’m a big fan of making pieces a bit larger and cutting them down.
Thanks for sharing.